
Because I am a foolish and cheap person, I am making paper flowers for my wedding. For what? I’m not sure exactly; I just know I want them. For centerpieces, for bouquets, for boutonniere, for whatever.
But they are $7 each to buy! (Though there are some really beautiful bouquets for sale on Etsy, if you’ve got more money than time).
I have a dictionary I rescued from a trashcan, and I like crafty things anyway, plus I figured making paper flowers would be a good way to get to do wedding things in the months before I could do anything practical.
As it turns out, it’s good that I started early. That $7 isn’t for supplies or difficulty: it’s for TIME. These suckers just take awhile. I can typically make two or maybe three during a movie; that’s about 30 to 45 minutes per flower.
So if you are brave, have some time on your hands, and want some cheap but pretty decorations, here is how to make them (cobbled together from several online tutorials and my own screw-ups).
1. Gather Supplies

I have my dictionary (circa 1970, a very good year), floral tape, scissors, Tacky Glue, and floral wire. I bought the Tacky Glue, floral wire, and floral tape at the craft store for less than $5. You could probably use Elmer’s glue or something similar instead, but this is NOT a craft for hot glue unless you have very burn-resistant fingers. Tacky Glue works great and dries pretty quickly.
With just these supplies, you’ll be able to make 30 flowers with stems. (You could make far more if you just need short stems).
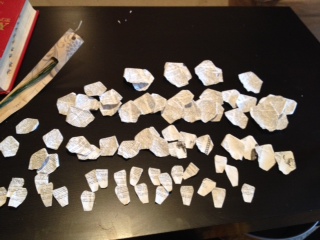
2. Cut Out Petals
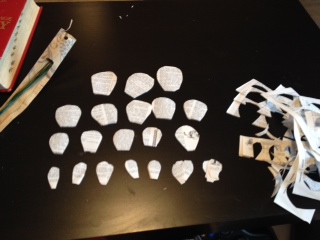
You’ll want petals in about 4 sizes: itty bitty; sort of roundish; large; and giant. They look sort of like Hobbit-hole doors or church windows. For the littlest ones, you’ll want the flat bottom bit to be at least 1/4 of an inch or you won’t have enough paper to work with. The big ones can be up to 3 or 4 inches, but you need them to be less wide at the base; anything more than an inch, inch and a half or so gets really unwieldy.
I don’t use a template, and I don’t really think you should either. Some oddity is useful for a project like this, and makes them look more like real flowers. Just get a range of sizes and you’ll be set.
I find I work best conveyor-belt style, so I cut out all the petals first. You’re going to need more petals than you think you will, so just make a bunch. With thin dictionary paper, you can cut out 4 pages at a time; just stack them together and cut away. I prefer to cut from the bottom edge and work up, so all my words are left-to-right, but this really doesn’t matter in the end. It’s just easier for me.
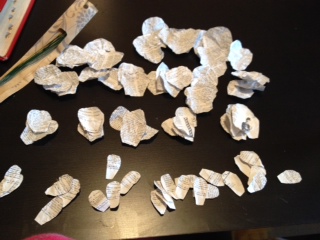
3. Crumple
Now that you have painstakingly cut out all those petals, you need to crumple them up. Take a few in your hand at a time and wad them up into little balls. Then uncrumple them a bit. You want your paper to be wrinkly; it makes the flowers look a little more realistic (trust me, it really does). I find it useful to sort of push the petal into my palm with the thumb of my opposite hand because this gives them a bit of a natural curve, but as long as you crumple them up, it doesn’t matter much. Crumple, then smooth out again.
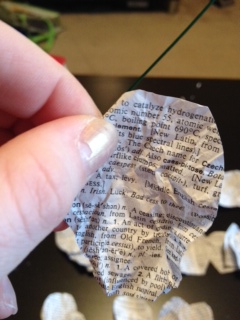
4. Roll Edges
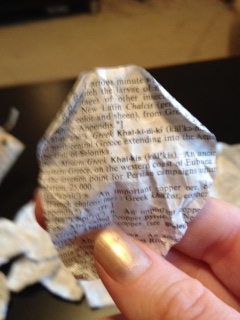
Now that you have crumpled them, you’re going to gently roll the edges back. Just the top, and for the smaller ones you may just make one roll; use your judgement. To roll the edges, I just fold the desired edge over a piece of floral wire and roll it between my fingers a bit until it takes the curl. This becomes the BACK side of the petal, the side that will face out.
Do this on all your petals. See how they lay differently now? They’re a tad more dynamic.
5. Prepare Your Floral Wire
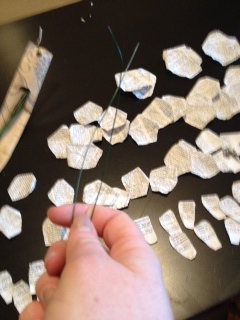 Ok, so your petals are complete: now it’s time to get your floral wire ready. If you’ve got the long kind like you see here, bend it in half, then cut with your scissors (it make take a bit of work, but it’s doable). Bonus points if you have wire cutters.
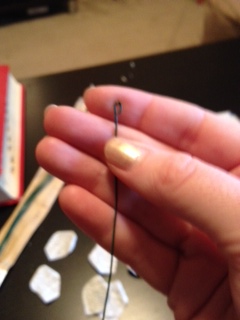 This is an important step, one that I didn’t find in other tutorials! If you may be moving your flowers around at all (or, um, if you have cats like mine who will immediately pull any flowers out of a vase), you need to now put a little loop in the top of your wire. Just bend the pointy bit down on your newly shortened piece and fold it into itself. It doesn’t have to be very big at all; you’re just making a place for the petals to “grip” so that when you drop your flowers (or your cat knocks them all off the counter), you don’t also lose your bud off its stem.
6. Glue On Petals
 Time to glue on your petals! Start with a dot of glue on one of your small petals. You’re going to place your wire loop right in that glue dot and then fold the petal over it, left to right. Basically just pinch it. Count to three. Your Tacky Glue should then be dry enough for you to keep going.
 In order for your rose to look like a real flower, you need to alternate your petal “start points.” Basically, don’t stack them all up behind each other. At this point, the project is less science than art; just do what feels right (bonus points if “what feels right” is a Fibonacci sequence, like in nature. I…am not that good).
Work small to big, using just a bit of glue on each petal. When you get to the bigger petals, your dot of glue will be some a thin line–just run your glue along the bottom, then pinch it around. Keep going until you feel like your flower is flower-like. Like this:
 7. Tape It Up

Next, you’ll need your floral tape. Cut yourself a piece about an inch and a half long.
 The tape should be slightly tacky but not actually sticky at this point, and it should be pretty easy to roll off. Cut it with scissors; tearing it is hard (on purpose).
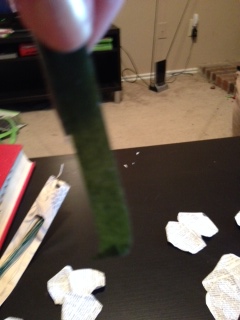
 You’re going to pinch your floral tape at the base of your rose. You’ll then slightly pull on your floral tape, causing it to stretch and become sticky. Wrap it around and slightly up onto the paper. This, for our horticulturalists in the crowd, will be how you make your sepal calyxes (everyone else: this is the thick green bit at the bottom of your flowers.)
 It should look kinda like that. It will be thicker at the top, and naturally thin out toward the green floral wire.
8. Ta-Da! You’re Done!
 Stick ’em in a vase and enjoy them! You may find the stems don’t “sit” well in the vase; the paper can be a bit too heavy. I just twist several wires together and that holds them in pretty well. If you’re using them for display, you could now put in some pretty stones or otherwise camouflage the floral wire, but mine are only temporarily in a vase, so this is perfect for me!
Good luck on your paper flowers! Let me know what you use them for.


Those are really pretty!
Thanks! I like them a lot.
My, but you are multi-talented. They look beautiful. I hope you get enough made before the big day. Oh, and the wife says thanks for the tutorial.
Thanks, and I apologize for all the teeny paper bits about to be strewn around your home!
Luckily I’m used to that. I find it disconcerting if I can actually see the floor, coffee table, living room chairs, my own feet…